

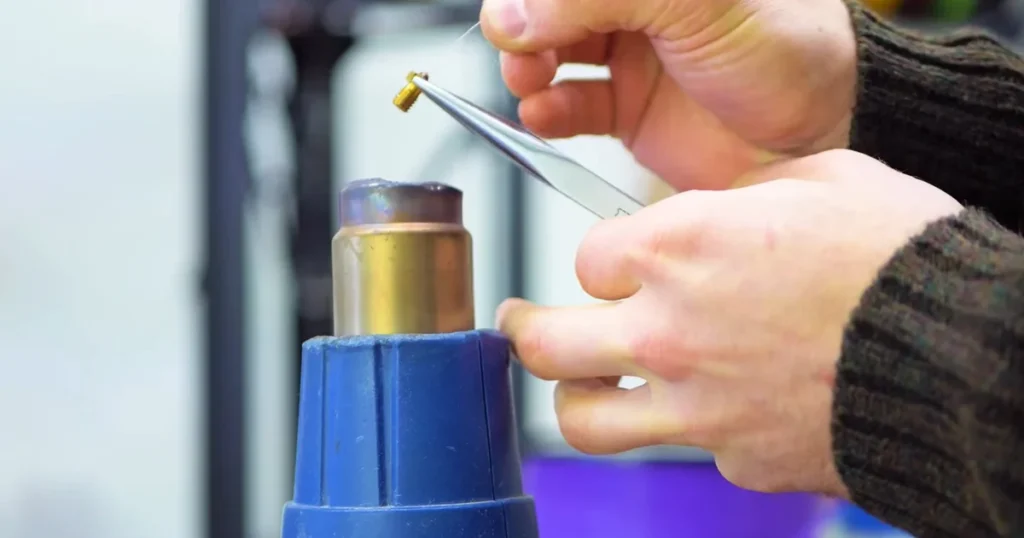
Got a clogged 3D printer nozzle? This comprehensive guide at LAVA3dp provides step-by-step methods to fix partial clogs, hotend jams, and full blockages using proven techniques like the cold pull. Clear your extruder clicking, learn material-specific fixes for PLA, PETG, and TPU, and get back to printing flawless layers today.
Few things disrupt a perfect print week like the sudden, rhythmic clicking of an extruder gear carving grooves into your filament. You look over at the build plate, and instead of a smooth layer, you see a wispy web of plastic or absolutely nothing at all. A 3d printer nozzle clogged issue is an inevitable rite of passage for anyone in 3D printing.
Whether you are pushing standard PLA through an open-frame budget machine or running engineering plastics through an enclosed system, understanding how to unclog a 3d printer nozzle keeps your workshop productive. This guide bypasses general theories to provide field-tested, practical protocols for clearing blockages and stabilizing your extrusion.
Why 3D Printer Nozzles Get Clogged
To solve a 3d printer nozzle clog, you first need to identify what caused the material to stop flowing. Blockages rarely happen without a clear mechanical or thermal trigger.
Low Printing Temperature
When your hotend temperature drops below the physical melting point required by your specific filament brand, the plastic thickens. The extruder tries to push this high-viscosity mass through a tiny orifice, resulting in an immediate 3d printer filament clogging event. This often happens if you switch brands of PLA or PETG without validating their actual thermal requirements on a temp tower.
Moisture in Filament
Wet filament causes structural problems inside the melt zone. When moisture-laden plastic hits a hotend at 200°C or higher, the trapped water instantly boils into steam pockets. These micro-explosions disrupt consistent pressure, cause localized material degradation, and lead directly to filament moisture problems that mimic mechanical blockages.
Dust and Debris Contamination
Filament spools sit on open shelves, collecting static charges that attract ambient dust, pet hair, and airborne particles. As the extruder pulls the dirty line into the hotend, these contaminants cook, carbonize, and form a solid crust inside the nozzle tip that a cleaning needle cannot easily pass through.
Heat Creep in the Hotend
Your hotend relies on a sharp thermal transition zone. The cooling fan must keep the heat break cold while the heater block melts the plastic below. If the cooling fan degrades or the ambient enclosure temperature gets too high, thermal energy moves upward. This causes heat creep causing nozzle jams because the filament softens prematurely inside the cold section, expanding and wedging itself tightly against the walls.
Incorrect Retraction Settings
Retraction pulls filament back during non-print travels to prevent stringing. However, if your retraction distance is too long, the machine pulls molten plastic out of the melt zone and upward into the cold heat break. The plastic cools, solidifies, and creates a stubborn heat break clog that blocks any subsequent extrusion.
Carbonized or Burnt Filament Residue
Leaving a printer idling at high temperatures for extended periods cooks the stagnant plastic inside the chamber. Over time, this material breaks down into a hard, black carbonized crust. When facing the issue of how to clean hardened filament from nozzle, this challenge requires manual mechanical removal because the burnt carbon will no longer melt at normal printing temperatures.
Abrasive Filaments Wearing the Nozzle
Glow-in-the-dark, carbon fiber, and wood-filled filaments contain microscopic hard particles. As these push through a standard soft brass nozzle, they erode the internal geometry. This nozzle wear and tear creates rough internal micro-pockets where material accumulates, degrades, and forms frequent partial blockages.
Symptoms of a Clogged 3D Printer Nozzle
Catching a restriction early prevents ruined prints and saves your extruder hardware from mechanical wear. Look out for these four core indicators.
Under-Extrusion and Missing Layers
When a 3d printer under extrusion caused by clog occurs, your print walls will look porous, brittle, or resemble a window screen. You will notice random gaps in your outer perimeters or infill layers that easily separate under slight finger pressure.
Extruder Clicking or Skipping Steps
When the path through the nozzle is restricted, backpressure builds up inside the hotend. The stepper motor lacks the torque to overcome this resistance. When your motor gear snaps backward and makes a sharp clicking noise as it loses its grip on the line, you are officially in need of a 3d printer extruder clicking fix.
Thin or Inconsistent Extrusion Lines
If you manually extrude filament into free air and it comes out significantly thinner than your nominal nozzle diameter—or if it curls sharply upward and sticks to the outside of the heater block instead of dropping straight down—you are dealing with an internal obstruction.
Filament Grinding at the Extruder Gear
When clicking turns into a total stall, the sharp teeth of your drive gear eat directly into the static filament strand. When the drive gear shaves the plastic down into a crescent shape and completely halts all material movement, you are dealing with catastrophic filament grinding. Resolving this requires an immediate extruder grinding filament solution.
No Filament Coming Out of the Nozzle
The most obvious symptom: the toolhead moves through its programmed path, the extruder spin gears turn, but the bed remains completely dry. The material has hit a solid, unyielding barrier inside the thermal block.
Related: Filament Dryers for PLA, PETG, ABS, TPU, and Nylon (2026 Guide)
Partial Clog vs Complete Nozzle Blockage
Treating every restriction with the same aggressive method can damage your components. Diagnosing the exact nature of the blockage saves time.
Signs of a Partial Nozzle Clog
If your prints start out looking perfect but steadily deteriorate an hour into the job, you are looking at classic partial nozzle clog symptoms. Material still exits the nozzle during manual loading, but it exits unevenly, swells abnormally, or shows severe surface defects. You have a small piece of debris or carbonized plastic dancing around inside the orifice, acting like a partial valve.
Signs of a Fully Blocked Nozzle
A complete nozzle blockage fix is required when no material passes through under manual pressure at maximum printing temperatures. The filament feels as though it is hitting a solid steel plate inside the hotend, and any attempt to force it by hand causes the line to bow or snap.
Why Correct Diagnosis Matters
Misdiagnosing a full blockage as a partial one can cause you to strip your extruder gears by applying excessive pressure. Conversely, assuming a partial clog is a complete block might lead you to tear down your entire direct drive setup when a simple cold pull or needle clear would have solved the problem in two minutes.
Tools You Need to Unclog a 3D Printer Nozzle
| Tool Name | Primary Function | Best Used For |
|---|---|---|
| Nozzle Cleaning Needle | Pierces and breaks up internal debris deposits | Quick fixes during a print job or manual loading |
| Cleaning Filament | Flushes out residual material colors and compounds | Transitioning between high and low temp materials |
| Brass Brush | Cleans external plastic buildup safely | Removing cooked residue from the nozzle exterior |
| Tweezers & Pliers | Pulls hot plastic strands and holds components | Manipulating filament without skin contact |
| Spare Nozzles | Immediate replacement for worn or dead parts | Severe clogs where time is critical |
| Heat Resistant Gloves | Protects hands from 200°C+ components | Holding the hotend block during tool changes |
3D Printer Nozzle Cleaner / Needle: Typically a 0.35mm or 0.4mm flexible stainless steel acupuncture needle.
3D Printer Nozzle Cleaning Tool Kit: Contains specialized wrenches, socket drivers, and picking tools tailored for hotend geometry.
Related: PETG Filament Explained: Pros, Cons, Print Settings & Best Uses in 2026
How to Unclog a 3D Printer Nozzle (Step-by-Step)
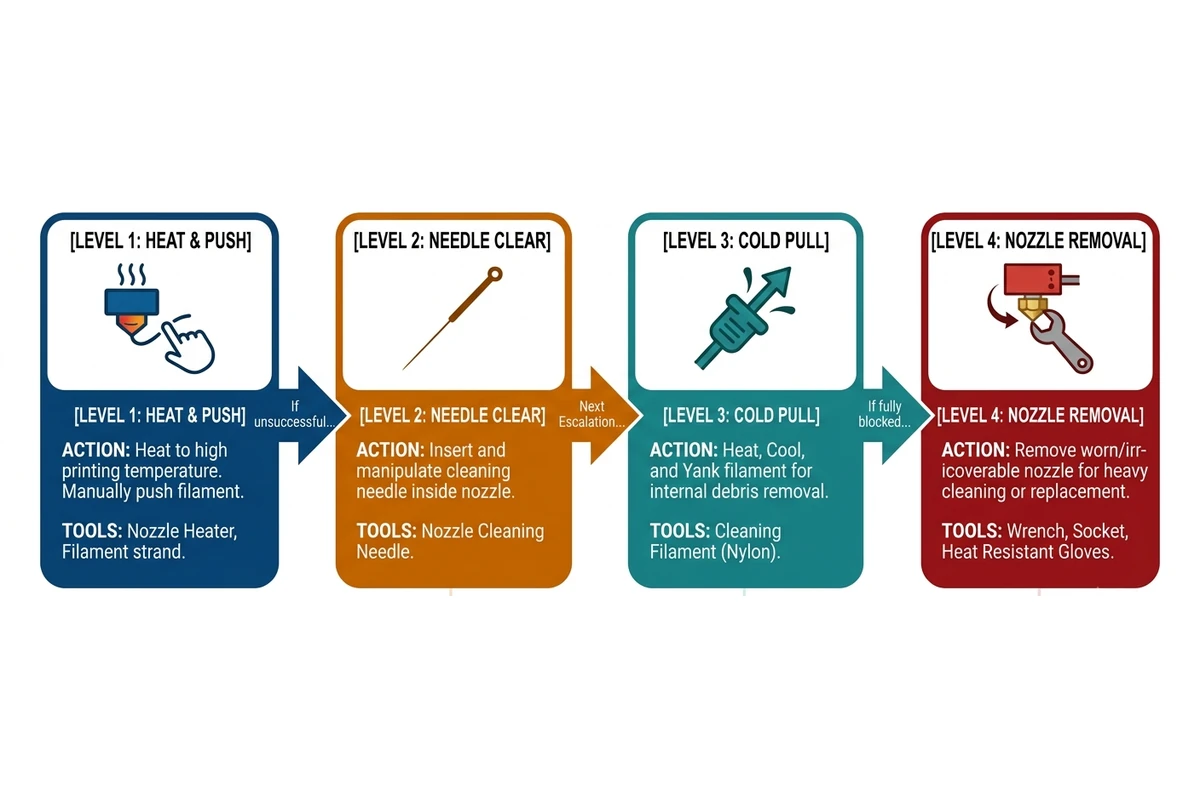
Heat the Nozzle to Printing Temperature
Raise your hotend temperature to the high end of your current filament’s thermal envelope. For PLA, set it to 220°C; for PETG, use 245°C. This reduces the viscosity of the material surrounding the obstruction.
Manually Push Filament Through the Hotend
Disengage your extruder tension arm or press the manual release lever. Grasp the raw filament strand with your fingers and push down firmly but smoothly. If the block is minor, this sudden manual head pressure can force the debris through the orifice.
Use a Nozzle Cleaning Needle
If manual pressure fails, take a nozzle cleaning needle from your nozzle cleaning kit. Insert the needle upward into the heated nozzle tip orifice. Twist and slide it up and down 4–5 times. Be careful to push straight up to avoid snapping the thin needle inside the block.
Perform a Cold Pull
When a needle merely displaces the debris without removing it, you must execute a cold pull. This extracts the entire solid plug along with the trapped contaminants out through the top of the hotend.
Remove and Inspect the Nozzle if Necessary
If the cold pull snaps or comes out clean but the blockage remains, you are dealing with a severe, solidified barrier. You will need to perform a physical teardown to remove filament stuck in hotend channels safely.
Reassemble and Test Extrusion
Once cleared or replaced, heat the hotend back to operating temperature, torque the assembly down to specification, and run a test extrusion of 50mm of light-colored filament to check for consistent line diameter and tracking.
How to Perform a Cold Pull Properly
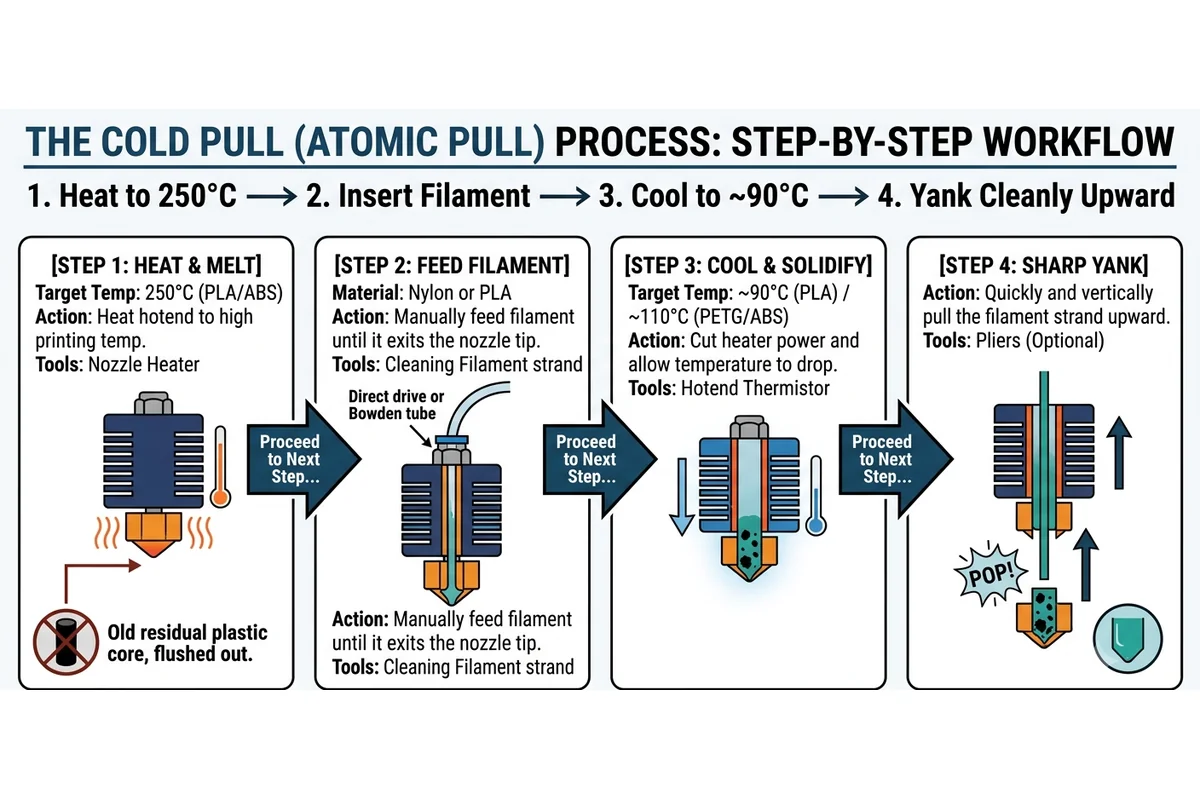
The cold pull method for clogged nozzle recovery (often called the Atomic Pull) is your most effective tool for internal hotend maintenance. It uses the natural structural integrity of a semi-cooled polymer plug to grab and pull out internal residue.
Best Filaments for the Cold Pull Method
Nylon is the premium choice for a cold pull because it has high tensile strength when cold and does not brittle or snap inside the heat break. If nylon is unavailable, standard, high-quality PLA works well, though it requires more precise temperature control to avoid snapping the neck of the plug.
Ideal Temperatures for PLA, PETG, and ABS
Heat your hotend to 250°C to completely melt out the old material core.
Manually feed your chosen cold pull filament until it begins to exit the nozzle tip.
Turn off the heater block completely and allow the temperature to drop.
For How to unclog 3D printer nozzle PLA: Wait until the temperature hits roughly 90°C–100°C.
For PETG/ABS: Let it cool down to approximately 110°C–120°C.
Pull the filament strand sharply and vertically upward out of the toolhead. You should hear a distinct pop as the molded plastic tip releases from the nozzle geometry.
Common Cold Pull Mistakes
Pulling too hot
The plastic stretches like warm taffy, leaving its tip behind inside the nozzle.
Pulling too cold
At temperatures below 80°C for PLA, you risk bending your toolhead gantry or damaging your Z-axis linear rails due to excessive mechanical force.
Pulling at an angle
Pulleys can bend or snap the entry entry point of your heat break or Bowden coupling paths.
How to Remove a Severe Nozzle Clog
When simple internal clearing methods fail, you must perform mechanical extraction to handle a complete nozzle blockage fix.
Removing the Nozzle Safely
Never try to unscrew a cold nozzle; you will instantly shear the brass threads off inside your aluminum heater block. Always heat the hotend to at least 230°C. Secure the square heater block firmly using an adjustable wrench or pliers to neutralize twisting forces, then use a dedicated socket wrench to back the nozzle out clockwise (looking from the top down).
Cleaning Hardened Filament Residue
Once the nozzle is out, use a brass brush for cleaning 3d printer nozzle components to scrape away the external melted plastic skin. To clear the internal cavity, hold the loose nozzle with pliers and heat it gently with a mini heat gun or propane torch until the internal plastic liquefies, then clear it out with your needle tool.
Soaking and Heating Methods
If you are dealing with pure PLA residue, you cannot easily dissolve it with household chemicals. However, if you are looking at how to dissolve PLA from a nozzle, you can use Ethyl Acetate or tetrahydrofuran (THF) in a glass container, though mechanical heat clearing is generally faster. For ABS blockages, soaking the removed nozzle in a small dish of standard acetone for 30 minutes completely dissolves the plastic plug.
When Cleaning Is No Longer Worth It
Standard brass nozzles are inexpensive consumable components. If you spend more than 15 minutes torching, picking, and scrubbing a 50-cent brass piece, you are wasting valuable time. If the internal bore is scored or coated in heavily carbonized sludge, discard it and install a fresh replacement.
Related: Is PLA Food Safe? The Complete 2026 Guide
Material-Specific Nozzle Clog Solutions
Different polymers break down under different chemical and thermal conditions. Tailoring your approach to your specific material prevents deeper hotend damage.
How to Unclog PLA Residue
PLA degrades into a hard sugar-like carbon compound if left cooked inside a hotend. To clear it, raise temperatures to 230°C to lower its viscosity, then use your stainless steel needle to break up the crystalline structure before flushing it through with fresh material.
How to Clear PETG Nozzle Jams
PETG is highly sticky and adheres aggressively to metal surfaces. When handling a clogged nozzle after printing PETG, heat the system to 260°C. PETG responds best to a nylon cold pull because it binds directly to the nylon carrier strand, pulling clean away from the brass walls.
Fixing ABS Blockages
ABS blockages are easy to resolve because the material dissolves completely in acetone. Remove the nozzle and drop it into an acetone bath. Within an hour, the plastic turns into a soft slurry that washes out cleanly under running water.
Solving TPU and Flexible Filament Clogs
TPU buckles easily under pressure. If you encounter a clogged nozzle after printing TPU, the flexible line has likely wrapped itself around your drive gear. Cut the tangled strand free, heat your hotend to 240°C, and use a piece of rigid PLA to push the residual elastic TPU plug down and out of the nozzle chamber.
Preventing Nylon-Related Clogs
Nylon requires high temperatures and absorbs moisture quickly. If it stays in the hotend too long without moving, it cooks into a clear, solid glaze. Always flush your hotend with a dedicated cleaning filament or standard PLA immediately after finishing a high-temperature nylon print run.
Hotend Jam vs Nozzle Clog: Understanding the Difference
Many users mistake a complex hotend jam vs nozzle clog dynamic, leading them to replace perfectly clean nozzles while the actual issue remains higher up in the feed system.
What Is Heat Creep?
Heat creep occurs when thermal energy migrates upward past the heat break, softening filament inside the cold-end guide tube. This creates an immediate physical wall. The extruder continues pushing, but the soft filament swells, creating a wedge that stops all movement.
Heat Break Clogs Explained
A heat break clog happens when there is an internal gap between your PTFE liner guide tube and the top flat shoulder of your nozzle. If your Bowden tube is not cut perfectly flat at a 90-degree angle, molten plastic pools into this gap, cooks, and creates a permanent restriction outside the reach of a cleaning needle.
Bowden Tube Problems That Mimic Nozzle Clogs
A degraded, burnt, or deformed PTFE Bowden tube clog tip increases friction along the filament path. This extra resistance mimics a nozzle restriction by forcing your extruder to click and grind, even if your actual brass nozzle tip is clear and pristine.
Related: Best Glue for PLA: Top Adhesives for Strong 3D Printed Parts in 2026
How to Prevent Future Nozzle Clogs
The best way to fix a clogged nozzle is to stop it from happening in the first place through clean material management.
Never leave your filament spools exposed on open hooks when not in use. Store them inside sealed polypropylene bins with dry silica gel packs or dedicated dry boxes to keep ambient dust and moisture away from the filament surface.
Invest in a dedicated filament dryer. Run your PETG, TPU, and Nylon spools through a dry cycle before every major print job. This eliminates wet filament causing nozzle clogs by removing the water molecules that cause irregular pressure inside the melt zone.
Always run a quick 10-minute temperature tower whenever you open a new brand or batch of filament. Finding the optimal balance between fluid flow and stringing prevents the under-extrusion issues that lead to mechanical jams.
Get into the habit of running a brush over your hotend tip.When performing a basic maintenance check, a quick 3d printer clean nozzle outside process using a brass wire brush prevents stray plastic wisps from collecting, burning, and tracking back into your prints.
Cheap, unbranded filaments often have inconsistent diameters (varying beyond the standard $\pm0.03\text{mm}$) or contain microscopic contaminants that will not pass through a 0.4mm opening. Using verified, quality lines reduces your maintenance overhead.
Keep your retraction distances as short as your extruder design allows. Direct drive extruders should use retraction distances between 0.5mm and 1.5mm. Bowden setups can go higher, between 3.0mm and 5.0mm. Going beyond these values risks pulling molten plastic into your cooling zones
Recommended 3D Printer Nozzle Maintenance Schedule
Consistent preventive care prevents unexpected print failures midway through long jobs.
Maintenance After Every Print
- Use a brass wire brush to clean any warm plastic residue off the exterior of your nozzle.
- Inspect your first layer for signs of dynamic tracking errors or uneven extrusion paths.
Weekly Maintenance Tasks
- Wipe your incoming filament lines to clear away any accumulated ambient dust.
- Check that your hotend cooling fan spins freely without vibrating or making loud bearing noises.
Monthly Hotend Inspection Checklist
- Run a single nylon cold pull to clear out any internal carbonized scale.
- Check the tip of your Bowden tube for thermal degradation or charring.
- Inspect your extruder drive gears for packed plastic dust and clean them using a stiff brush.
Should You Clean or Replace Your 3D Printer Nozzle?
Knowing when to clean a nozzle and when to throw it away keeps your print quality consistent and saves time.
Signs Your Nozzle Can Be Saved
If the blockage is caused by a simple PLA print jam or a minor dust particle, a needle clear or a couple of cold pulls will easily restore its factory flow characteristics.
Signs It’s Time for Replacement
If the circular exit hole looks oval, scratched, or deformed, or if the flat bottom tip has worn down from dragging across a textured bed, discard it. A worn nozzle tip cannot maintain the flat pressure needed to lay down smooth, even layers.
Expected Lifespan of Brass and Hardened Steel Nozzles
- Standard Brass Nozzles: Last for 200–500 hours of clean PLA/PETG printing. They degrade quickly if exposed to abrasive composite materials.
- Hardened Steel Nozzles: Can run for over 1,000 hours, even when pushing aggressive glass-fiber or carbon-filled polymers without showing dimensional wear.
Related: 10 Best Resin 3D Printers in 2026: Tested Picks for Every Budget
Common Nozzle Cleaning Mistakes to Avoid
Cleaning at the Wrong Temperature
Trying to force a cold cleaning needle into a cold nozzle will snap the steel tip off inside, ruining the nozzle. Conversely, working at extremely high temperatures (above 280°C) without a clear purpose can cook any trapped plastic into an unmanageable carbon crust.
Using Excessive Force
If you find yourself hammering down on your filament or wrenching your toolhead with heavy pliers, stop. Applying excessive vertical force can bend your thin linear guide rods or crack your plastic carrier housings.
Damaging the Nozzle Orifice
Never use steel sewing needles, drill bits, or harsh steel wire brushes on a soft brass nozzle tip. Steel is much harder than brass; it will scratch the internal bore and widen your 0.4mm exit hole into an imprecise, rough opening.
Ignoring Wet Filament Problems
If your filament is sizzling and popping as it exits the hotend, your issue is not a mechanical block. Trying to fix this with needles and teardowns is pointless—you need to dry your filament spool in an oven or dedicated dryer to fix the root cause.
Final Thoughts
Dealing with a clogged 3D printer nozzle is an ordinary part of maintaining a machine. By using a systematic approach—starting with basic manual clear techniques before moving to cold pulls and mechanical teardowns—you can fix most blockages in under fifteen minutes.
Keep your filament clean, store it in dry boxes, and perform regular preventive maintenance to ensure your machine spends its time creating clean prints rather than sitting disassembled on your workbench.